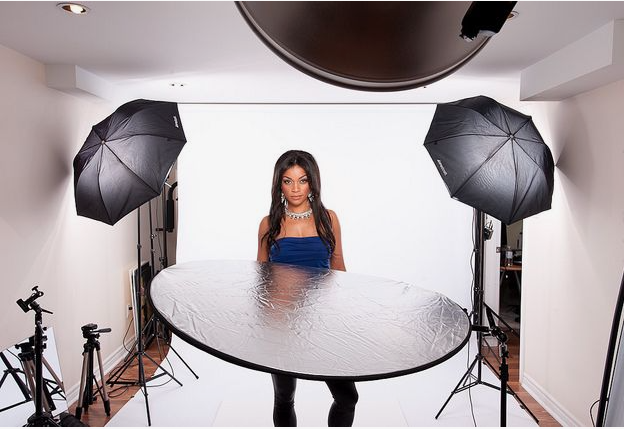
The Essential Light Setup for Portrait Photography.
Your Portrait photography journey begins with light. In fact, without light, photography simply cannot happen—it is essentially the art of painting with light.
Mastering lighting is the most crucial lesson in photography. If you’re feeling overwhelmed by all there is to learn, focus on this first. Once you understand lighting, you’ll unlock the ability to create stunning Portrait images.
In this guide, we’ll explore the basic lighting setup for Portrait photography and introduce essential lighting concepts to help you get started. DSLR Cameras for Portrait Photography: A Beginner’s Guide to Choosing and Using the Best Gear
The Foundation of Light Setup for Portrait Photography
While the term “basic” may sound limiting, this setup is anything but ordinary. It forms the foundation for crafting soft, beautiful light, which is a hallmark of Portrait photography. From this starting point, you can refine your skills and experiment with light to shape mood and storytelling.
Here’s what your setup should include:
- Sidelight: Position your light source (e.g., a window) next to your scene.
- Diffuser: Place a diffuser between the light source and your subject to soften the light.
- Reflector: Use a reflector on the opposite side of the light source to bounce light back onto your subject.
Start by setting up your scene next to a window with the light coming from the side. Place a diffuser closer to the window than your subject, and add a reflector on the opposite side to fill in shadows as needed. This simple setup serves as the groundwork for creating soft, flattering light. What Is a Camera Sensor?
Essential Light Modifiers
To manipulate natural light effectively, you’ll need two basic tools:
- Diffuser: This softens and evenly distributes light onto your subject. Place it between your light source and the subject for optimal results.
- Reflector: This bounces light back onto your subject, filling in shadows and creating balance. Reflectors can be as simple as a piece of white foam board or more advanced metallic surfaces.
Pro Tip: You can find affordable diffuser-reflector combos online. Opt for larger sizes if possible for better light coverage. Full Frame vs Cropped Sensor: Which Is Better for Portrait Photography?
Soft Light: The Gold Standard for Portrait Photography
Soft light is the most commonly used type of lighting in Portrait photography. It produces soft-edged shadows that enhance texture, form, and dimension in Portrait. Whether you’re aiming for a bright or moody aesthetic, soft light can adapt to any style.
Take a look at your shots with and without a diffuser or reflector, and notice the difference in how shadows appear. Neither is wrong; they simply offer different visual effects.
Key Lighting Directions
The two main directions of light in Portrait photography are:
- Sidelight: Light comes from the side of the subject relative to your camera. It works well for most Portrait setups, making it a go-to for beginners.
- Backlight: Light comes from behind the subject and towards the camera. It’s great for creating a dramatic, backlit glow, especially for drinks or translucent Portraits.
Experiment with both directions to see how each shapes your subject and adds depth to your images.
Natural Light and Time of Day
Natural light changes throughout the day, affecting its intensity, direction, and color. Morning light is soft and cool, midday light is harsher, and evening light is warm and golden.
Understanding how light shifts in your shooting space can significantly improve your results. Spend time observing light in your home during different hours and seasons. This practice will train your eye to recognize the best conditions for your shots.
Lighting Equipment on a Budget
For under $100, you can build a basic lighting kit, including:
- A large diffuser (e.g., Neewer 40″ x 60″)
- A smaller portable diffuser for on-location shoots
- White and black foam boards for reflectors and light shaping
- Affordable clips to secure your foam boards
Investing in these essentials ensures you’re equipped to create professional-quality photos without breaking the bank.
Lesson Activity: Observe and Feel the Light
To deepen your understanding of light, try this simple exercise:
- Set an hourly alarm on a day when you’re home.
- Each hour, walk into every room with a window, including the garage or shed.
- Observe the light and ask yourself:
- How bright or dim is the light?
- Are there noticeable shadows?
- Which direction is the light coming from?
- What time of day is it, and how does the light feel (warm, cool, neutral)?
Repeat this exercise over two days to observe how weather and time of year affect light. Why Focal Length Matters in portrait Photography and How It Can Improve Your Shots
Recap – Light Setup for Portrait Photography
Here are the key takeaways from this guide:
- Place your setup next to a window, using a diffuser and reflector for soft, balanced light.
- Invest in a diffuser and reflector as essential light-modifying tools.
- Master soft light to highlight Portrait texture and dimension.
- Experiment with side and backlight to find your style.
- Natural light changes throughout the day and seasons—observe and adapt to it.
Lighting is the cornerstone of Portrait photography. By mastering this foundational setup, you’ll be well on your way to capturing stunning, mouthwatering images.
