Everything Portrait Photographers Need to Know About the Exposure Triangle.
The exposure triangle is a foundational concept in photography. While it may initially seem challenging to grasp, with practice, it becomes second nature. Understanding this concept is crucial for mastering manual mode and effectively capturing the desired light in your photos.
What Is the Exposure Triangle?
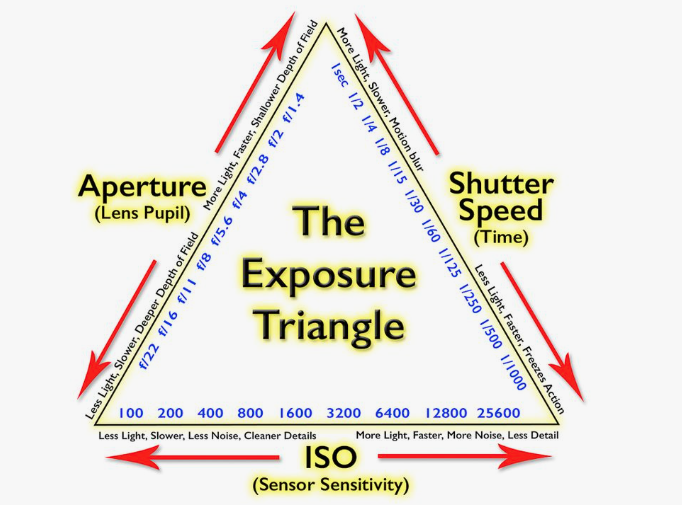
At its core, the exposure triangle is a relationship between three essential camera settings: aperture, shutter speed, and ISO. These three elements work together to determine the exposure of your image, which refers to the amount of light that reaches your camera’s sensor.
Each setting plays a unique role, and the combination of all three creates the right balance to achieve your creative vision. Let’s break down these components and explore their importance. Quick Guide to Metering for Portrait Photography: Which to Use and When
1. Understanding Exposure
Exposure refers to how much light per unit area reaches your camera’s sensor. It directly impacts the brightness or darkness of your photo.
- Overexposure: The image appears too bright, often losing important details in the highlights.
- Underexposure: The image is too dark, obscuring details in the shadows.
- Correct Exposure: The ideal balance that conveys your desired mood, concept, or story.
Ultimately, the “correct exposure” is subjective—it’s the one that best complements your vision.
2. Aperture: Controlling Light and Depth
Aperture is the opening in your lens that controls how much light enters the camera. It influences two key factors:
- Light: A wider aperture lets in more light, while a narrower aperture reduces it.
- Depth of Field: This determines how much of the scene is in focus.
- Wide Aperture (e.g., f/2.8): Lets in more light and creates a shallow depth of field, ideal for isolating your subject with a blurred background.
- Narrow Aperture (e.g., f/8): Lets in less light and increases depth of field, keeping more of the scene in focus.
Example:
- A Portrait photographer might use f/2.8 for a soft, dreamy background when highlighting details of a dish.
- For a flat-lay shot where every element needs to be sharp, f/8 might be more suitable.
3. Shutter Speed: Capturing Motion and Light
The shutter speed determines how long your camera’s shutter remains open to allow light onto the sensor. It’s measured in fractions of a second.
- Fast Shutter Speed (e.g., 1/500): The shutter is open for a very short time, freezing motion and letting in less light.
- Slow Shutter Speed (e.g., 1/30): The shutter remains open longer, allowing more light to enter but potentially introducing motion blur.
Practical Tip: For Portrait photography, if you’re using a tripod, you can use slower shutter speeds to brighten your image without compromising sharpness.
4. ISO: Sensitivity to Light
ISO measures your camera sensor’s sensitivity to light.
- Low ISO (e.g., ISO 100): Produces cleaner images with minimal noise but requires more light.
- High ISO (e.g., ISO 1600): Increases sensitivity, useful in low-light situations, but introduces grain or noise.
For Portrait photography, it’s best to keep ISO low (e.g., 100–400) to maintain image clarity. Using a tripod can help you achieve this even in dim lighting. Why Focal Length Matters in portrait Photography and How It Can Improve Your Shots
Balancing the Exposure Triangle
The exposure triangle works as a system where changing one setting affects the others:
- Increasing aperture size (e.g., f/2.8) requires faster shutter speed or lower ISO to avoid overexposure.
- Using a slower shutter speed (e.g., 1/30) might require a smaller aperture or lower ISO.
Mastering this relationship allows you to control your image’s brightness, sharpness, and overall mood.
Tips for Shooting in Manual Mode
Shooting in manual mode can feel intimidating at first, but with practice, it becomes easier. Here’s how to start:
Step 1: Set Your Aperture
Choose an aperture based on your creative goals.
- Want a blurred background? Use a wide aperture (e.g., f/2.8).
- Need everything in focus? Go for a narrow aperture (e.g., f/8).
Step 2: Adjust Your ISO
Set ISO to the lowest possible setting for your lighting conditions.
- Use ISO 100–200 in bright environments.
- For low-light scenarios, use ISO 400–800, but keep an eye on noise levels.
Step 3: Dial In Your Shutter Speed
Adjust the shutter speed to achieve the desired exposure.
- On a tripod, use slower speeds (e.g., 1/30) for more light.
- Handheld shots may require faster speeds (e.g., 1/100) to avoid camera shake.
Practice Activity: Learn by Experimenting
Set up your camera on a tripod and experiment with different settings:
- Set ISO to 200 and aperture to f/4.5. Adjust the shutter speed until you achieve a bright image.
- Change ISO to 400 and aperture to f/5.6. Again, adjust shutter speed to get the same brightness.
Compare the resulting images to see how different settings can achieve similar exposures. Editing Whites in Food Photography: 2 Simple Tips for Perfect White Balance
Key Takeaways – Portrait Photographers Exposure Triangle
- Exposure: The amount of light reaching the camera’s sensor determines image brightness.
- Aperture: Controls light and depth of field. A wide aperture creates a blurred background; a narrow aperture provides more focus.
- Shutter Speed: Dictates how long the camera’s shutter stays open. Slow speeds let in more light; fast speeds freeze motion.
- ISO: Adjusts sensor sensitivity. Low ISO = less grain, High ISO = brighter images but more noise.
- Balance Is Key: Adjust settings in tandem to achieve your desired exposure and mood.
With consistent practice, understanding and using the exposure triangle will elevate your Portrait photography to new heights.
